Kubernetes Cluster on Raspberry Pi zero using Cluster Hat
Once I've read this blog(3日間クッキング【Kubernetes のラズペリーパイ包み “サイバーエージェント風”】), I wanted to deploy k8s cluster on Raspberry Pi.
However, It's too expensive for me in this blog's way. Need three Raspberry Pi 3 Model B and switching hub ... etc.
So I've created k8s cluster Raspberry Pi Zero, but It was very hard for me than I thought.
I'll introduce the creation of k8s cluster on raspberry pi zero in this time.
And this is totally useless because of using the older version, and not for production. In addition unstable behavior and very slowly.
I made only for my pleasure. If you're interested in, make it.

Component List
Prepare the following components.
We need at least one Raspberry Pi Zero
- Cluster Hat v2.3 x 1 (23.33£)
- Raspberry Pi B+ x 1 ($35)
- Raspberry Pi Zero x 1-4 (3.88£/per)
- Micro SD Card x 2-5
- Power Cable x 1
- Lan Cable or USB Wifi Adaptor
※You can buy Cluster Hat and Raspberry Pi in Pimoroni(https://shop.pimoroni.com/)
Prerequisite
- Assembled with ClusterHat(https://clusterhat.com/setup-assembly)
- Install Raspberry Pi OS(latest) to Controller Node(Raspberry Pi B)
Component Role
| Hardware | Role of ClusterHat | Role of K8S |
|---|---|---|
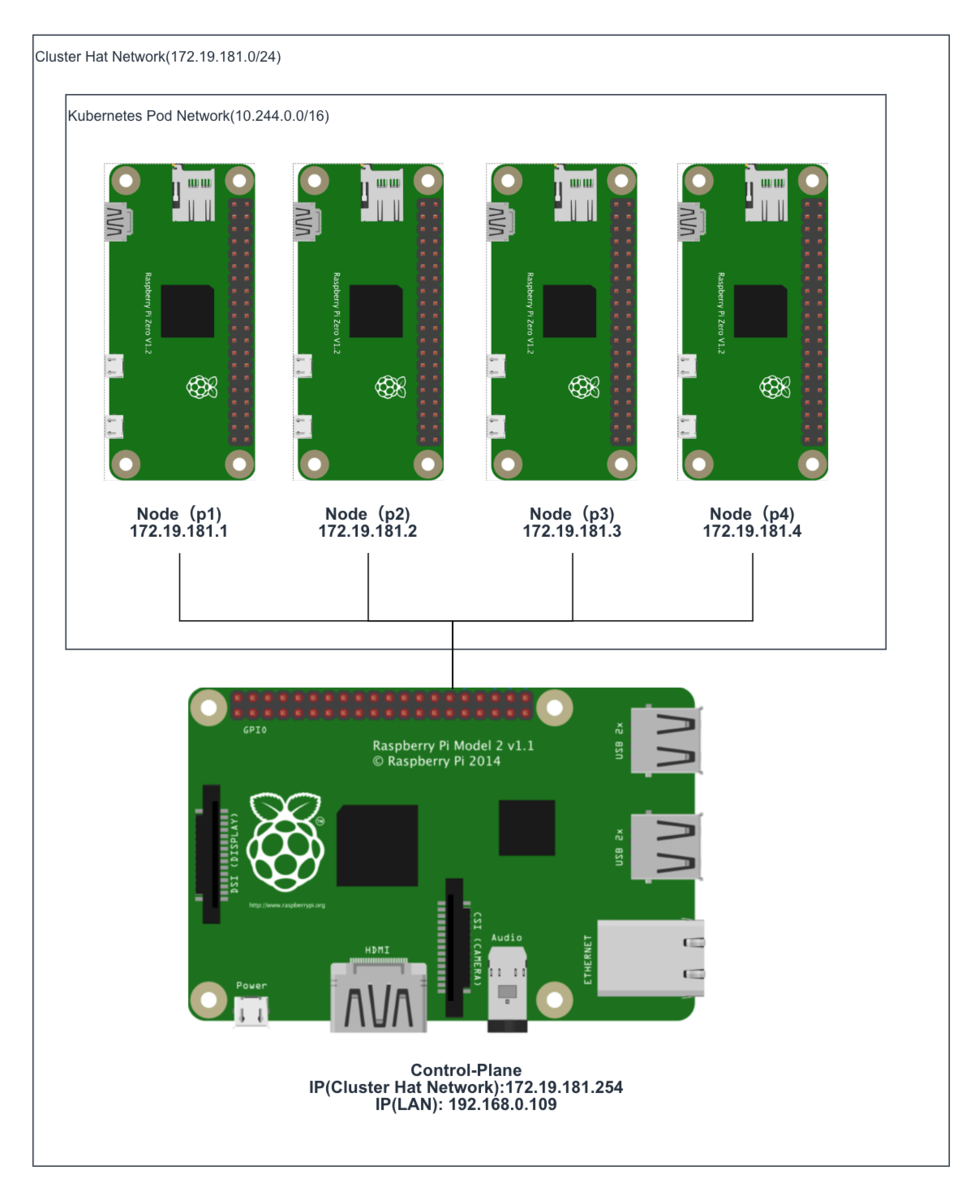
| Raspberry Pi B+ | Controller | Control-Plane |
| Raspberry Pi Zero x (1 - 4) | Node | Node |
| ClusterHat | - | - |
※ Raspberry Pi Zero( or Zero W)
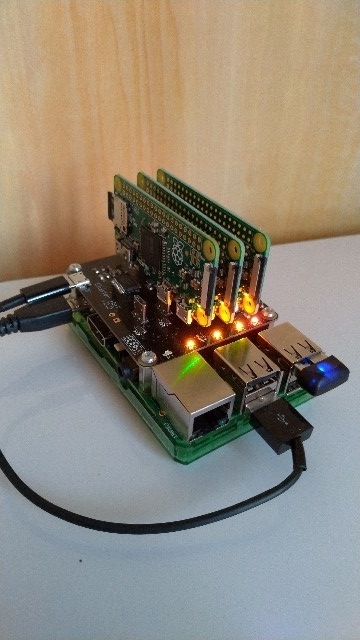
This is my environment(actually, I used 3 raspberry pi zero)

1. Create Raspberry Pi Zero Image for ClusterHat and k8s
1-1. Create old raspbian image
Create Raspberry Pi Zero image from 2017-11-29-raspbian-stretch-lite because latest raspbian image can unavailable cpuset.
execute the following command in Controller Node of ClusterHat
# wget http://ftp.jaist.ac.jp/pub/raspberrypi/raspbian_lite/images/raspbian_lite-2017-12-01/2017-11-29-raspbian-stretch-lite.zip
# unzip 2017-11-29-raspbian-stretch-lite.zip
# apt install kpartx
# git clone https://github.com/burtyb/clusterhat-image
# cd clusterhat-image/build
# mkdir {img,mnt,dest,mnt2}
# mv 2017-11-29-raspbian-stretch-lite.img img/
# create.sh 2017-11-29
if it is well, the Raspbian image should be in dest directory.
ClusterCTRL-2017-11-29-lite-1-CNAT.img
ClusterCTRL-2017-11-29-lite-1-p1.img
ClusterCTRL-2017-11-29-lite-1-p2.img
ClusterCTRL-2017-11-29-lite-1-p3.img
ClusterCTRL-2017-11-29-lite-1-p4.img
1-2. Write the image to micro sd
Download this Raspbian image to local.
Write CNAT.img to Controller Node(Raspberry Pi B+), others to the node(Raspberry Pi Zero).
Create ssh file at boot directory for connecting ssh each node.
If you're on a Mac, execute the following command after writing.
# touch /Volumes/boot/ssh
1-3. Start Controller Node
Confirm connecting to Controller Node
From local machine.
# ssh pi@[controller ip_addr]
From Controller Node
# ssh pi@[172.19.181.1-4]
Password is raspberry
2. Setting Node of ClusterHat
2-1. Install library to Controller Node
Install python-smbus because lacked library for clusterhat command. Execute the following command.
# apt-get install python-smbus
After install, execute clusterhat command.
# clusterhat status
2-2. Setting Nat
For Node connect to the internet, Setting Nat.
Execute the following command
# apt-get -y install iptables-persistent
# iptables -t nat -A POSTROUTING -s 172.19.181.0/24 ! -o brint -j MASQUERADE
# iptables -A FORWARD -i brint ! -o brint -j ACCEPT
# iptables -A FORWARD -o brint -m conntrack --ctstate  RELATED,ESTABLISHED -j ACCEPT
# sh -c "iptables-save > /etc/iptables/rules.v4"
3. Setting All Node of ClusterHat
3-1. Hold kernel version
# apt-mark hold raspberrypi-kernel
3-2. upgrade
# apt-get upgrade -s
Check it has not changed kernel version
# uname -a
Linux p1 4.9.59+ #1047 Sun Oct 29 11:47:10 GMT 2017 armv6l GNU/Linux
3-3. Install Docker
Install with fixed version(18.06.1~ce~3-0~raspbian)
# curl -sSL https://get.docker.com | sh
# usermod -aG docker pi
# apt-get install docker-ce=18.06.1~ce~3-0~raspbian
If docker command not well, reinstall docker.
# apt-get remove docker-ce
# apt-get install docker-ce=18.06.1~ce~3-0~raspbian
3-4. Hold Docker version
# apt-mark hold docker-ce
3-5. Install Kubernetes
Install kubernetes with below version.
# curl -s https://packages.cloud.google.com/apt/doc/apt-key.gpg | apt-key add -
# echo "deb http://apt.kubernetes.io/ kubernetes-xenial main" > /etc/apt/sources.list.d/kubernetes.list
# apt-get update
# apt-cache madison kubeadm
# apt-get install kubelet=1.5.6-00 kubeadm=1.5.6-00 kubectl=1.5.6-00 kubernetes-cni=0.5.1-00
4. Setting the Control-Plane Node(Controller Node of ClusterHat)
4-1. Initialize a Kubernetes Control-Plane node
Execute the following command on control-plane
# kubeadm init --pod-network-cidr 10.244.0.0/16
Probably it should stop at the following log (in 5-10minitus)
<master/apiclient> created API client, waiting for the control plane to become ready
Check the logs,you should see the following logs
# journalctl -eu kubelet
"error: failed to run Kubelet: unable to load client CA file /etc/kubernetes/pki/ca.crt: open /etc/kubernetes/pki/ca.crt"
※because creating ca(ca.pem) file name and refference ca(ca.crt) file name are different
Solution of this trouble
Change file name as follows
cd /etc/kubernetes/pki
cp ca.pem ca.crt
After change file name, waiting for a while.
if it well, memo the following such a output.
# kubeadm join --token=18b644.0438585f9e20e864 192.168.0.109
4-2. Install flannel
Create file as follows
kube-flannel.yml
---
apiVersion: v1
kind: ServiceAccount
metadata:
  name: flannel
  namespace: kube-system
---
kind: ConfigMap
apiVersion: v1
metadata:
  name: kube-flannel-cfg
  namespace: kube-system
  labels:
    tier: node
    app: flannel
data:
  cni-conf.json: |
    {
      "name": "cbr0",
      "type": "flannel",
      "delegate": {
        "isDefaultGateway": true
      }
    }
  net-conf.json: |
    {
      "Network": "10.244.0.0/16",
      "Backend": {
        "Type": "vxlan"
      }
    }
---
apiVersion: extensions/v1beta1
kind: DaemonSet
metadata:
  name: kube-flannel-ds
  namespace: kube-system
  labels:
    tier: node
    app: flannel
spec:
  template:
    metadata:
      labels:
        tier: node
        app: flannel
    spec:
      hostNetwork: true
      nodeSelector:
        beta.kubernetes.io/arch: arm
      tolerations:
      - key: node-role.kubernetes.io/master
        operator: Exists
        effect: NoSchedule
      serviceAccountName: flannel
      containers:
      - name: kube-flannel
        image: quay.io/coreos/flannel:v0.7.1-arm
        command: [ "/opt/bin/flanneld", "--ip-masq", "--kube-subnet-mgr" ]
        securityContext:
          privileged: true
        env:
        - name: POD_NAME
          valueFrom:
            fieldRef:
              fieldPath: metadata.name
        - name: POD_NAMESPACE
          valueFrom:
            fieldRef:
              fieldPath: metadata.namespace
        volumeMounts:
        - name: run
          mountPath: /run
        - name: flannel-cfg
          mountPath: /etc/kube-flannel/
      - name: install-cni
        image: quay.io/coreos/flannel:v0.7.1-arm
        command: [ "/bin/sh", "-c", "set -e -x; cp -f /etc/kube-flannel/cni-conf.json /etc/cni/net.d/10-flannel.conf; while true; do sleep 3600; done" ]
        volumeMounts:
        - name: cni
          mountPath: /etc/cni/net.d
        - name: flannel-cfg
          mountPath: /etc/kube-flannel/
      volumes:
        - name: run
          hostPath:
            path: /run
        - name: cni
          hostPath:
            path: /etc/cni/net.d
        - name: flannel-cfg
          configMap:
            name: kube-flannel-cfg
Execute the following command.
#kubectl create --validate=false -f kube-flannel.yml
※ it takes a long time(about 30〜40minutes)
5. Setting the Kubernetes Node(Node of ClusterHat)
5-1. Copy ca.crt from Control-Plane
Download ca.crt from Control-Plane, and Upload the file to node.
scp pi@[control-plane ip_addr]:/etc/kubernetes/pki/ca.crt .
scp pi@[node ip_addr]:ca.crt /etc/kubernetes/pki/ca.crt
because when executed join command, not created ca.crt(probably bug)
if you execute join command without this 5-1, you should face the following trouble.
after executing join command, the following output.
Node joins complete:
but node not joined.
Check the log.
# journalctl -eu kubelet
"error: failed to run Kubelet: unable to load client CA file /etc/kubernetes/pki/ca.crt"
5-2. Join to Control-Plane
Execute the following command(at 4-1's command) each node.
# kubeadm join --token=18b644.0438585f9e20e864 192.168.0.109
6. Check if the installation was successful
If you can see the following output, you got success.
# kubectl get nodes
NAME      STATUS         AGE
cnat      Ready,master   2h
p1        Ready          1m
p2        Ready          9m
p3        Ready          19m
and look this command output
# kubectl get pods --all-namespaces -o wide
NAMESPACE     NAME                              READY     STATUS    RESTARTS   AGE       IP              NODE
kube-system   dummy-2501624643-8jrkj            1/1       Running   0          2h        192.168.0.109   cnat
kube-system   etcd-cnat                         1/1       Running   0          2h        192.168.0.109   cnat
kube-system   kube-apiserver-cnat               1/1       Running   0          2h        192.168.0.109   cnat
kube-system   kube-controller-manager-cnat      1/1       Running   0          2h        192.168.0.109   cnat
kube-system   kube-discovery-2202902116-pwwaf   1/1       Running   0          2h        192.168.0.109   cnat
kube-system   kube-dns-2334855451-aq9pj         3/3       Running   1          2h        10.244.0.2      cnat
kube-system   kube-flannel-ds-5tz4s             2/2       Running   2          22m       172.19.181.3    p3
kube-system   kube-flannel-ds-k5vsc             2/2       Running   0          3m        172.19.181.1    p1
kube-system   kube-flannel-ds-kasde             2/2       Running   0          1h        192.168.0.109   cnat
kube-system   kube-flannel-ds-uumv1             2/2       Running   2          11m       172.19.181.2    p2
kube-system   kube-proxy-2ku07                  1/1       Running   0          2h        192.168.0.109   cnat
kube-system   kube-proxy-d9xxo                  1/1       Running   0          22m       172.19.181.3    p3
kube-system   kube-proxy-dz146                  1/1       Running   0          11m       172.19.181.2    p2
kube-system   kube-proxy-gvcs1                  1/1       Running   0          3m        172.19.181.1    p1
kube-system   kube-scheduler-cnat               1/1       Running   0          2h        192.168.0.109   cnat
What kind of trouble occurred
1. Unavailable cpuset on latest raspbian image (1-1)
created old raspbian image with being able to use cpuset.
2. Can't initialize kubernetes on kubeadm(4-1)
kubeadm created ca(ca.pem) file, also kubeadm reference ca(ca.crt) file, but both file name is not same.
So Renamed the ca.pem file to the ca.crt.
3. Can't deploy the latest flannel(4-2)
The latest flannel can unavailable in this version of kubeadm.
I used an old flannel version.
4. Node can't join to Control-Plane(5-1)
When execute join command, node can't join to Control-Node.
The cause of this problem is the node doesn't have ca.crt. Probably should be created automatically when joining.
This can be solved by copying the ca.crt from Control-Plane to Node